Before all, I want to say that this lesson of photos is not intended to give you 100% of knowledge for all camera and photography but give you the foundation to do a minimaly built photo.


The lesson consists of :


1) Description of the camera's bases (compact, bridge and DSLR)

2) Description of the four variables of the camera (ISO, shutter speed, aperture, focal length)

3) Description of the rules of composition (Rule of thirds, Brightness, Focus)

4) Description of accessories (Lenses, card, battery, flash, remote controls, filters, tripods, bags)


- - - - - -
home top of the page returne

1) Description of the camera's bases (compact, bridge and DSLR)


We will start with the description of the compact. First a compact typically consists of a simplified compact case (start button, zoom, the trigger, the viewing button, menu button, delete and a directional pad to navigate into the menus.), a low magnification lense (1x to 5x), a large rear screen, strap and sometimes a flash.

appareil photo numérique apn canon compact compacte

A compact is not really required settings from the user, in effect, choosing the menu the type of photo you want to , The camera adjusts settings automatically to the situation. In the same sense of simplicity, compact incorporate some ''addons'' images such as frames or images (clown's hat, stars, etc. ...).On average, the compacts have 6 megapixel.


We will now talk a little about the bridge. To begin, we take a compact camera and we add several things. Bridges are midway between compact and SLR cameras, that's why we call them ''bridges''. Already, Bridges has a zoom so much more than a compact, generally the zoom is 15x maximum. Some bridges were also small interchangeable lenses, but their number is relatively small. The sensor is also a bit bigger and has a better construction. Another important development between compact and bridge is the ability to''disengage''the camera (also called M-mode), like a reflex.

appareil photo numérique apn canon bridge G12

While the compact does not have a flash, all the bridges have one. Except in very rare exceptions. Where the compact has an average of 6 megapixels, the bridge also remains at 10 megapixels.


We continue the evolution of cameras to reach the final stage: the Reflex. First, a reflex, is not a single block. It consists of at least two basic elements: the body and the lense.

appareil photo numérique apn canon Reflex réflexe 5DII 5D mark II

The photo quality and performance of the DSLR will be determined by the two. All aspects the size of the photos, the ability to render colors well, with autofocus, the speed of the burst of photos and different settings are associated to the body. The lense is associated with the optical quality (distortion, sharpness, chromatic aberration), the focal and brightness.
All the Reflex have the ability to change lenses and often have an excellent optical fleet, which means that there is a wide range of lenses. Some brands also have an optical fleet larger than others (Canon, Nikon, Sigma although it does not really make body camera).

appareil photo numérique apn sigma optiques lenses objectifs
Reproduction authorized by SIGMA


Being able to easily change lenses and have a wide range is a big part of the strength of the Reflex. This allows to adapt to all situations: low light, small and long lens. Another good point of the Reflex is the sensor. Indeed, the Reflex sensors are larger and better built than those of compact and bridge. Having a larger sensor allow two things : the amount of pixels can be increased and having a better quality in high ISO sensitivity. Another important point of Reflex is very responsive to zoom in / out and for the development thanks to hand rings located on the lens.
With also the responsiveness, it is the burst and focusing. Where does a compact camera, see two photos per second and the bridge two or three, the reflex rise up to ten pictures per second. For photos animal, action or sports, a quick burst is important to properly fix the action. Just as the focus, because if the focus is behind the subject, the picture is missed. The compact again lag behind, where the DSLR do the focus in less than half a second between the outbreak and taking pictures, the bridge is less than a second, but the compact can be up to two seconds.


Comparative table of the types of cameras:

Feature Compact Bridge Reflex
Dimensions Low (fits in a shirt pocket) Middle (the equivalent of two fists) Large (size varies from 1 / 2 L to the size of a suitcase full (1))
Weight Very light (less than 200g) Lightweight (100 to 400g) Heavy (between 500g and several kilos (1))
Ease of use Very simple Very simple to medium, may require to read the manual Medium to complicated, requires to read the manual
size photos (2) Between 6 and 10 megapixels Between 8 and 14 megapixels Between 10 and 22 megapixels
Sensor Size 4.29 x 5.76mm 5.7 x 7.6mm 24 x 36mm
Optical quality Low between low and medium Depends on the target
Shutter Speed 1 / 1'500th up to 15 seconds 1 / 4'000th to 15 seconds 1 / 8'000th to 30 seconds + bulb (bulb or b)
aperture F/2.8 to F/5.9 F/2.8 to F/4.5 F/1.2 to F/22(3)
Focal Length (4) 28-112mm 24-840mm 8-3'840mm(5)(6)
ISO(7) 80-1'600 (400) 80-3'200 (800) 50-25'600 (6'400)
type referred By rear screen By rear screen or viewfinder offset By rear screen or pentaprism TTL (through the lens)
Built-in flash Yes, medium range: 4m Yes, medium range: 7m + flash shoe Not always, medium range: 12m + flash shoe
Video Mode Yes, on average 640 x 480p, 30 img / s Yes, on average 1280 x 720p, 24 img / s Not always, 1920 x 1080p, 30 img / s
Types photo files JPG JPG + RAW(not always) JPG + RAW
Connections Mini USB 2.2 Mini USB 2.2, mini-HDMI, output A/V (PAL/NTSC) Mini USB 2.2, Mini-HDMI, Video output (PAL / NTSC), external remote jack, mini jack for stereo microphone
Types of memory cards(8) SDHC SDHC SDHC, CF
Capacity of the batterie(9) 240 photos 370 photos 1'000 photos
Prices(10) 62.00€ to 241.00€ 163.00€ to 410.00€ 364.00€ to 5'597.00€(11)
(1) according to the amount of lenses. (2) on average in 2011. (3) depending on the target. (4) equivalent 24x36 also called full-frame sensor. (5) depending on the target. (6) the longest focal obtained was taken with a 2X teleconverter, the lens Canon 800mm and a 1.6x crop sensor (APS-C sensor). (7) the value in brackets is an indication of the maximum recommended before too much noise (deteriorating the picture), Changing this value for each device that value is given solely for information purposes. (8) most frequently used. (9) basic batterie, photo at 23 ° C, 50% normal, 50% flash. (10) Average price found on the internet site manufacturer. device the cheapest and most expensive category (July 3, 2011). (11) Body Only without purpose.


- - - - - -
home top of the page returne

2) Description of the four variables of the camera (ISO, shutter speed, aperture, focal length)

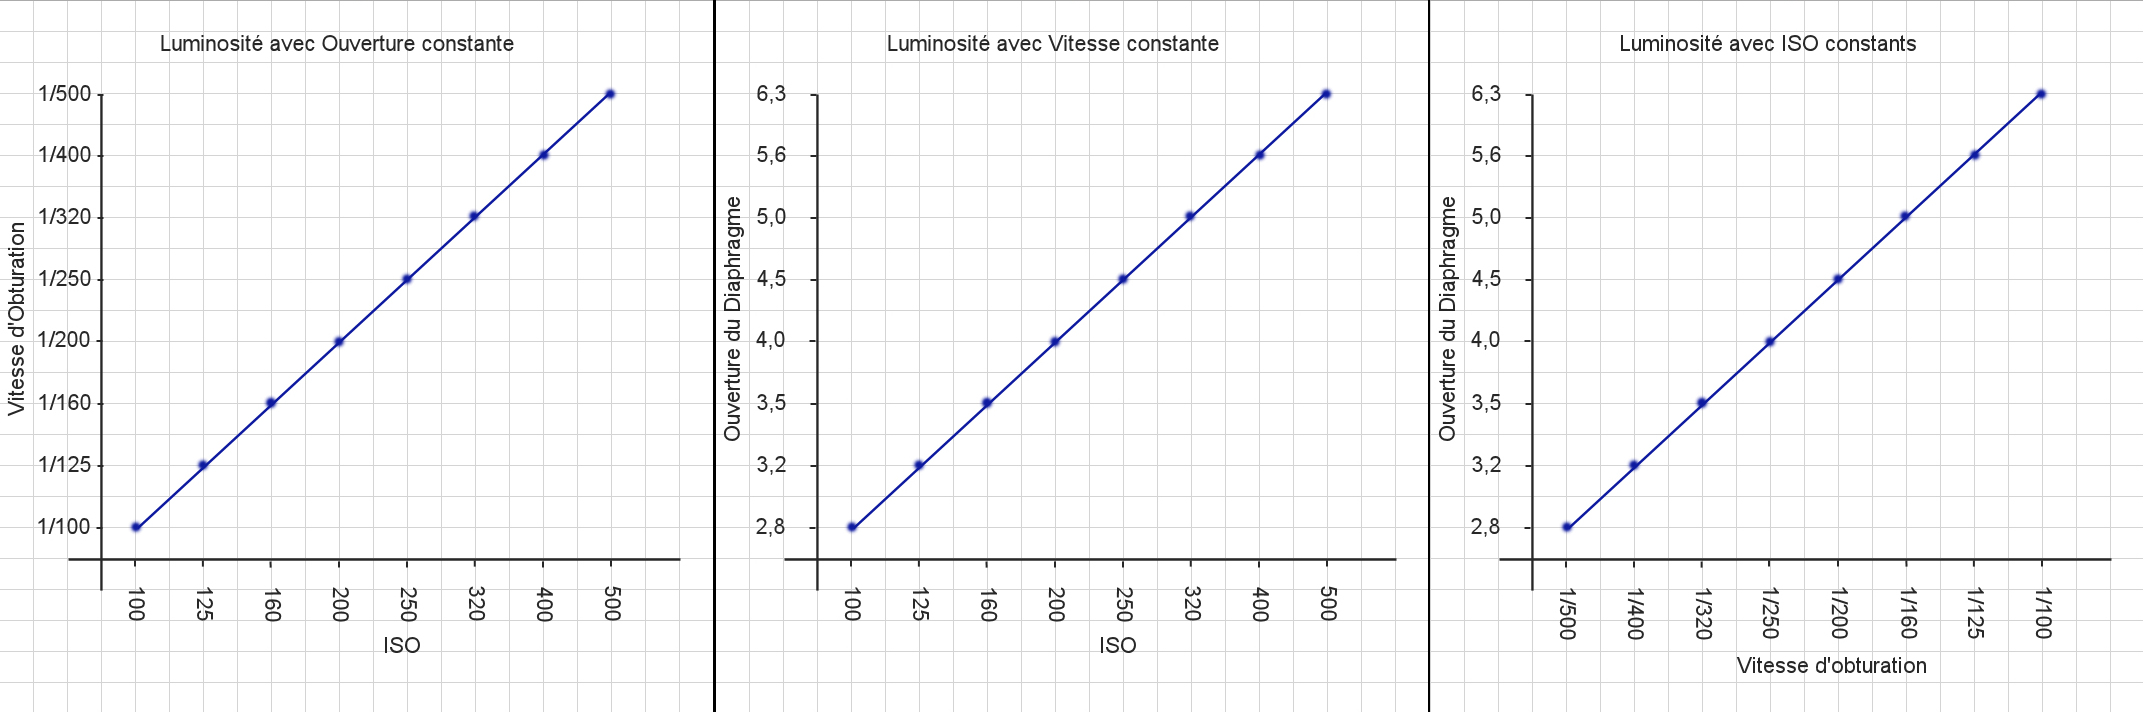
We start this section by showing three small graphics of three variables in pairs: - Speed and aperture - aperture and iso - iso and speed

graphique photo vitesse obturation diaphragme ouverture


As shown in the graphs, the brightness changes linearly with the three variables. This means that for a speed step further, you could stay one step of ISO or diaphragm. For example: I have a second 1/125ème speed, openness to F/3.5 and ISO 400. By moving to 1/160th, to keep the same brightness I can either go to F/3.0 and ISO 800. And it works in 2 directions with 3 variables.

From this short introduction we will start by talking about the ISO.

First, what are these ISO? This is simply the value of signal amplification that comes from the sensor. The basic signal is ISO 100, ISO 200 then means that the signal was doubled, iso 400, the signal was the basis for multiplied by 4 and so on. Came at a time, the signal will saturate it at this point that the digital noise. Digital noise comes little by little, the''critical''(when the noise is so severe now that it degrades the picture) depends on each device, some will have a very low noise (400 ISO for the compact, for example) while others have a very high threshold (ISO 6,400 for some reflex). This noise value depends on several things:
- Sensor size
- The number of megapixels
If you have a small but full of megapixel sensor, the noise will be low because the cells of the sensors (the photosites) will be smaller then more easily saturated.
If instead we have a large sensor with little megapixels, the noise will be high.
Consider two extreme examples: if you have a tiny 2x3mm sensor with 20 megapixels, there is a risk of noise from 110 ISO. If we take a full-frame sensor (24x36mm) and can not put him as a pixel, the noise will appear after several million ISO.

This does of course that the theoretical values??.


Now turn to the variable shutter speed. First, the shutter speed depends on the speed of the device to raise the mirror, open the curtain of the sensor to light with the sensor, close the curtain of the sensor and replace the mirror.
First, what are these mirrors and curtains? The mirror is simply the room mid-transparent and semi-reflective that lets you see what you want to photograph in the viewfinder. A mirror is present on some bridges and the reflex, the compacts do not. The curtains are actually fine and light strips that cover the sensor when it should not take pictures. And the curtains move away when we should take the picture (the sensor must be light).

More than one camera has a shutter speed faster, the device may set a fast movement. In contrast, if the device is not fast enough, a blurred picture. Also, more speed, the lower the sensor will have time to take the light, so the picture will be darker. We have to take care about the focale-lenght and the speed, generaly it's not good to be quickly than the focal lenght. By exemple, if we have a focale lenght of 244mm we may not be quicker than 1/250th seconde. In the case of a focale lenght less than 50mm, we stay at 1/50th seconde, because of the shaking of the body.


Penultimate point for this part of the course, the aperture.
This variable allows you to play on the background area focused and brightness. The back-and plan focused area is the same function, namely what will be the distance over which we have the subject line. For example, with an aperture of F/1.4 at about 1m distance and a focal length (more on this topic the last point.) 50mm, nettetée area will be about 5 cm away. Which shoed that everything that is outside of our area focused will be blurred. This allows for beautiful blurred backgrounds (also called''Bokeh''or''Fund''). Conversely, with an opening at F/22 and under the same conditions, focused our area is close to 1m.
Over a diaphragm is open, the number is small. Plus the diaphragm is closed, the higher the number is large.
Changing the opening also influences the amount of light: an open aperture allows light to pass large quantities, while not closed diaphragm leaves little to spend.
We must learn to juggle as a function of luminosity, size and speed of our subject, the way we want to make it stand out from the bottom in order to choose the values ??of shutter speed and aperture (the ISO moving only rarely).


Last point of the explanation variables of the camera: the focal length.
The focal length is the distance between the virtual image striking the surface of the front lens of the lens and the virtual image recorded by the sensor.

For comparison, the human eye has a focal length of approximately 50mm. So a short focal length allows you to enlarge its field of view and a long lens reduces the field of vision. In other words, less than 50mm focal length, it has a broad vision and when one is above 50mm, the closer the subject, it is bigger. There is talk of ultra-wide-angle (also abbreviated UGA) when the focal length is less than 14mm, wide angle of between 24 and 15mm; trans-standard 25 to 70mm, focal length of between 71 and 500mm, very long focal above 500mm.


- - - - - -
home top of the page returne

3) Description of the rules of composition (Rule of thirds, Brightness, Focus)

After the material lesson and instead directed adjustment of the camera, we will see how to compose the photos by three simple rules.
Already, the rule of thirds. As its name suggests, we will compose the picture as four lines and four important points:

graphique photo vitesse obturation diaphragme ouverture

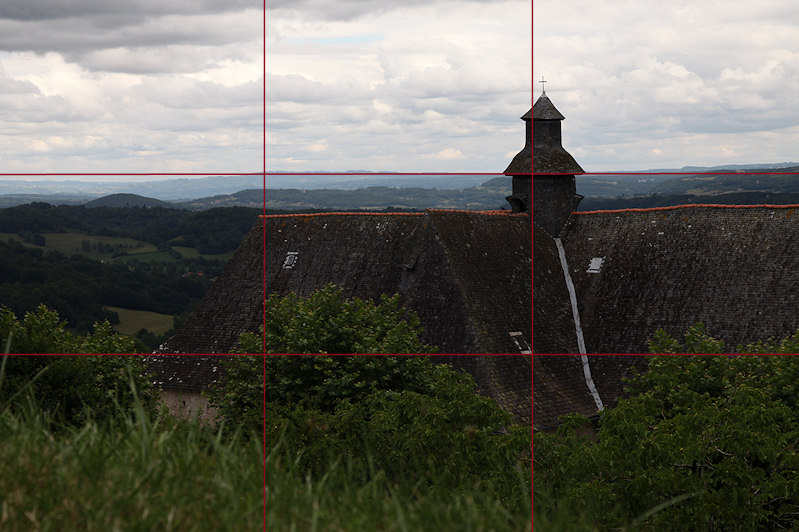
To translate this figure into words, let's just say that when taking a photo, if the soil we are interested we put it on 2 / 3 of the photo and 1 / 3 of heaven, if heaven before us, simply reverse: 2 / 3 of heaven and third floor. Like left and right with their elements, that's for the lines.
Now, for the points, it's just as simple: we simply place the important point of our subject (eye node, center, etc ...) the crossing of two lines of third parties: we call the''hot spot''. For example, a picture of a bird looking to the right, we'll put the eye about the top left, to leave space for the eye to that is not found it blocked by the edge of the photo. Leaving 1 / 3 soil and 2 / 3 of the sky, it increases the ability to fly the bird, the sky is his kingdom. I agree, this may seem little but this is what gives dynamics to the picture. In general, the size of photos come in 2 / 3, it is no accident.

It is often said that we should not focus (the''full''pellet as the call) but when you make a symmetrical composition, it reinforces the symmetry sought. They also say that making square format breaks the rule of thirds, but a square format is great for symmetry centered precisely.


Second point of this part of the course: The brightness, again relatively simple. Just do not have zone''blocked''(black) and no areas ''burned''(white). For example, a sky full white house well lit and then a bridge where the bottom is completely black but the sky much detail clouds. For this, a bridge or a reflex, just look at the small scale on which a cursor moves according to where you point the camera: it is the brightness scale. If the cursor is at the center, the light is balanced, if instead the cursor looks one side or the other, it must be corrected, at the risk of having a bad light (if the cursor from left, is too dark, if he goes right, it's too light.).


Last point for this part : the Focus. Usually, the Focusing have to be on the subject. If the subject have them : on the eyes, beceause it's the most importante part of the animals.

This part was not very long or difficult, but it's the bases of the photographer.


- - - - - -
home top of the page returne

4) Description of accessories (Lenses, card, battery, flash, remote controls, filters, tripods, bags)

Last section of this lesson : the accessories. And they are a lot. From the wifi memory card to the submarine case. There is the list of the accessories we'll see during this lesson :

- the lenses
- the memory cards
- the batterie
- the flashs (integrated or not)
- the remote controler (principaly for the DSLRs)
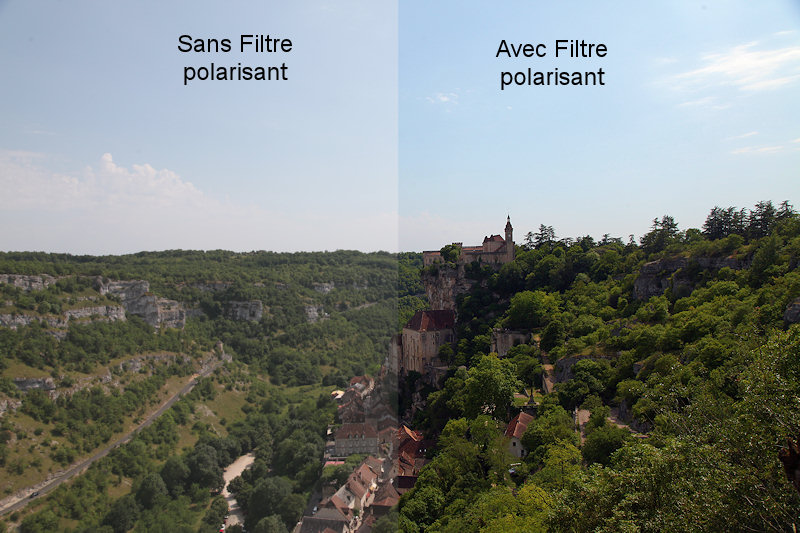
- the filters
- the tripods and monopods
- the transport and the protection of the photo material.

- - -
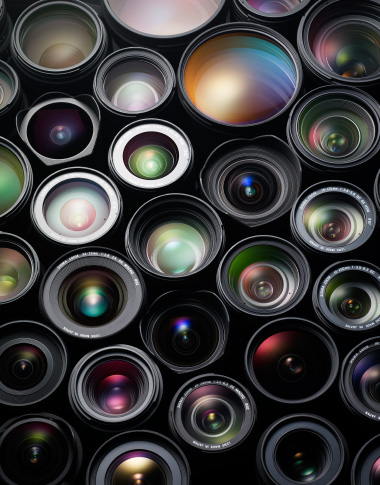
The lenses. I'll not do a detailled description of all the lenses, only the most used and some specials.

The first lense we have is the 18-55mm F/3.5-4.5., It's the trans-standard basical lense. It's not wonderfull but it can do everything basic. Cheap, small, light, in a word, it's perfect for beginning.

Juste after, we have the 50mm '' super-bright at F/1.4, the perfect lense for portraits and low luminosity. This lense is interesting because it's the same focale lenght as the human eye and it's the cheapest focale because very easy to build.

We may have a 55-200mm or 70-300mm F/4-5.6 for long-range focale, small, light and cheap, like the 18-55mm and doing the following range from the basical lense. This lense is quickly bought from the people that want to see far away. Some, like the 70-300mm form Sigma, have the ''macro''mod for taking some insects's photos.

Now we will see a very better quality than the first ones with the Canon ''L'' series (the red ring), the Sigma ''EX'' series and the Nikon ''VR'' series. The first one is the Canon 24-105mm F/4L, it stay at the same aperture (same luminosity) for all the ranges. Plus his good optical quality, it has a macro-mod the allow it to be used from 20cm from the subject.

In the long-range focals it existed a Canon 1'200mm F/5.6, but now it's a Sigma EX 800mm F/2.8. It's a monstruouse lense that can be used only with a tripod.

Sigma again : the Fisheye 8mm F/3.5 EX that can lake half-spherical photos at 180°, if we aren't carefull, we may have our feet on the photo.

Between these two extrem-lenses, there is the Nikon serie ''G'' 17-70mm F/2.8, a important minus-max focal range and heavy too.

In the longe-range, there is the famous ''white body and red head'', the Canon 70-200mm F/2.8L IS USM II. The one that every Canon users are dreaming.

After seeing far away, what about watching close to us : the macrophotos, maybe wih the Canon 100mm macro F/2.8L.

Or, for usinf a more powerfull super-macro-lense, the Canon MPE-65mm F/2.8. When the other lenses have a magnificient of 1:1 max, this one is going to 5:1 and if we have a teleconvertissor 2x, it's going to be a 10:1 ! Like a microscope.

In the particular lenses, there is the Canon 24mm Tilt-Shift, with this lense, we can do some interessting things like correcting a building because of the lense deformation or doing a ''maquette'' effect.

There were some basicals and specificals lenses.

- - -
Let's talk about the cards mémoire.Pour Compact and bridges, are generally used in SD cards, SDHC, MMC, Memory Stick and Memory Stick PRO Duo. The Memory Stick and Memory Stick PRO Duo is specifically designed and used only by Sony. SDHC cards are high-capacity version of SD cards, these do not exceed 4GB.
For the SLR, there are the same size card, but are added CF cards (Compact Flash). In 2011, the capacity of cards ranging from 2GB to 64GB and transfer rates of up 60Mo/seconde. Some cards also have an integrated wireless module to unload the card as and when a computer nearby. The card brands are generally Sandisk, Lexar and Sony.
Where a 2 or 4GB card base (6Mo/seconde) is more than enough for a compact, it is better to take a card of 4 or 8GB Ultra II (15Mo/seconde) for bridges and entry-level SLR . Reflex for the greedy, if it is small enough, it is mieus take CF cards in 16GB Extreme III and Extreme IV 60Mo/seconde.

- - -
A quick about batteries. The compact has a low capacity, a bridges medium-size and a reflex has high capacity and the ability to have multiple batteries with a''grip''(something that is screwed in the housing and in which was a''rack''may contain two batteries or 6 batteries). It takes between 1 and 5 per mAh picture taken, what makes a full battery of 2'000mAh can make between 400 and 2,000 photos, depending on the use of flash, autofocus, zoom, the use of the rear screen etc ...

- - -
The flashes, they are integrated or external are chasms to electricity, so it is better to cells or batteries. The flashes are the most integrated 5x less powerful than the external flashes and less powerful 25x worse. Another difference is that we can not direct the flash, but they are much less great. A good external flash can be up to 50m and automatically adjust the power he must give the lightning flash.
The flash is very useful in low light conditions but also in direct sunlight, such as backlighting that can lead to''shadow'' : Do not have a silouette all black and a blue sky, but to have color and texture in place of the black silouette. It also, if it is used to highlight the texture of such a wall plastered by positioning it in oblique light.

- - -
The remote controls are extremely useful in cases of long exposure: not to shake the camera when the trigger (but you can always use the timer to the case of long exposures without having to trigger instant). You can also use the remote when using long lenses and that it is slow compared to the focal length. You can also find automated triggers, that take a photo every X seconds, it is a very useful little box to make timelapse videos (they are videos whose images are taken more slowly than its rendering speed (by example, one photo per second, and then put 24 pictures per second for the video)).

- - -

photo exemple filtre polarisant avec / et sans
Filters, whether colored or polarizing a picture can change dramatically. Take the example of polarizing and neutral density filter. A polarizing filter polarizes the light (as the name implies) and allows to highlight the blue of the sky, remove or increase the reflection of non-metallic surfaces such as surface or in the windows. It also darkens the picture a bit (we lose the equivalent of a notch or two in brightness) and add contrast. The neutral density filter it, simply acts as Darkener. Depending on the density of the ND filter, you can lose the equivalent of up to 10 notches of brightness. This is useful when long exposures of day (water movement for example).

- - -
Tripods and monopods, although a little bulky offer great possibilities of shooting for the bulb, for stability and to withstand a heavy target. We can obviously take support on a fence or muretou other things, but it was not always on hand and can not rotate them as desired. Some tripods can even wrap their feet around branches, rods, tubes, etc ... to have a few little pictures if acrobatiques.Même monopods are less contrived and cumbersome, they are less stable than tripods.

- - -
Last part: the protection and transportation. The solutions are many, we can protect the screen back with a plastic window, we can protect the front lens with a UV filter, although there are some devices to be able to go under water to 1 or 2 m deep, they are rather rare and confined to the compact. Also, in order to protect its Reflex to 35m below the surface, how? Using a waterproof case. Some are cheap, are 10m are light and even allow the carriage of the flash, it is not, strictly speaking, watertight, airtight bags, but rather, just as strong and transparent bags. If you descend below or if you prefer the security of a real box, there are several on the market but they are very expensive and for each new goal requires a new window part of the housing associated the target.
As for sacks and bags, usually the first to be bought is a tote bag. It must be big enough to take to the batteries and extra cards, lenses, flash and obviously the case. Then, depending on the evolution of the material some may prefer a''slingshot''(one-shoulder strap backpack that you can quickly switch in front of you), a backpack or tote to keep the two brands there which fall well outside the lot: LowePro and Kata due to their resistance


This is the end of this course photos, I hope it will have been useful to learn the basics of the photo or supplement your knowledge.
There is also no secret from the news, the latest (but longer and harder) thing left to do is to practice the picture, as they say, it's with forging that we bacome forge-man, this applies very well to photography.

Valid XHTML 1.1