This ''small'' lesson is there to give the basics and some tips on how to film in general and especially with an SLR camera.
Before starting this lesson, it is strongly advised to read
the lesson photo
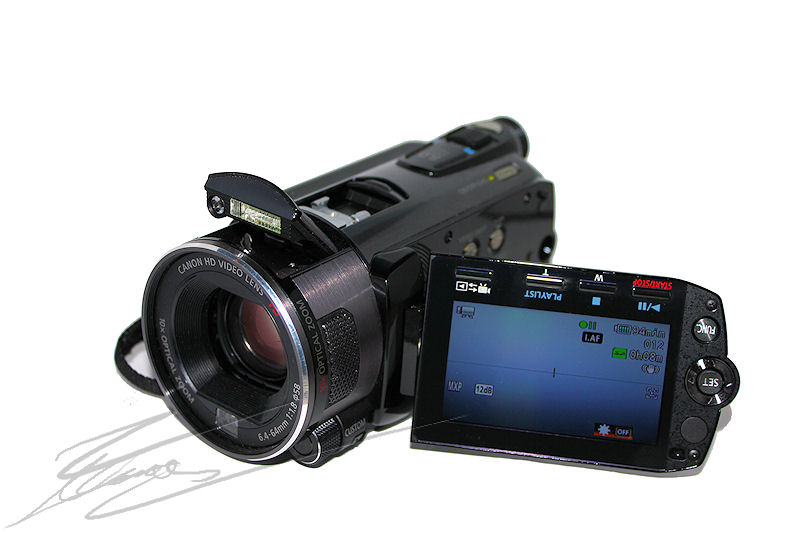
I hardly spoke camcorders because I rarely use them. One example is the Canon Legria equipment HFS100 (as I have and I
could use it for a while).
Reproduction authorized by Canon
Below is a table comparing the Canon LEGRIA HF S100 and the Canon EOS 5D Mark II (for comparison between the material I usually use and a camcorder
''Semi-Pro''-quality over 1'000 €). The characteristics of the 5DII for this table are taken with the 5DII, the 24-105mm f/4L, a charged battery,
a SanDisk 16GB Extreme III CF and the audio system of my production (Micro Stereo bass on flash shoe and micro-ice added).
Parameters
Values Legria
Values 5DII
Dimensions
70 x 69 x 136 mm
158 x 117 x 166 mm
Weight
450 g
1'550 g
Ease of use
Medium, may require reading the manual and some practice
A bit complicated, requires reading the manual and practice
Max size photos
3264 x 2456 pixels, 8.02 Megapixels (mode 4:3)
5616 x 3744 pixels, 21.02 Megapixels (mode 3:2)
Sensor Size
4.27 x 5.74mm
24 x 36mm
Stabilisation
Optical, continue
Optical, continue
Shutter Speed
1/2'000ème up to 1/6ème second
1/8'000ème up to 30 seconds + bulb (bulb or b)
Aperture
F/1.8-F/3 to F/8
F/4 to F/22
Focal lenght(1)
video : 43,5-435mm
photo : 39,9-399mm
24-105mm
ISO
100-800 (Gain 0, 6, 12, 18 db)
50-25'600
type referred
By left rotate screen
By rear screen
Build-in flashlight
Yes, medium range : 4m
No
Video mode
1920 x 1080p, 25 img/s
1920 x 1080p, 25 img/s
Types video files
.MOV, H.264 at 45 Mbits/second
.MOV, H.264 à 75 Mbits/second
Connections
Mini USB 2.2, mini-HDMI, mini jack for stereo microphon, mini jack for stereo headset
Mini USB 2.2, Mini-HDMI, Video output (PAL / NTSC), external remote jack, mini jack for stereo microphone
Types of memory cards
SDHC
CF
Capacity of the batterie(2)
40 minutes without the flashlight
100 minutes
Autofocus
AF continue and manual
AF manual
(1) equivalent 24x36 also called full-frame sensor.
(2) basic batterie, video at 23 ° C, screen turned ON, stabilisation ON.
Unlike a camcorder or a camera, an SLR camera is much less handy base. Already getting started on a camcorder to zoom in, use a small button for this purpose and focus is
fast enough on its own, the all with one hand. But for an SLR, it must be the case with one hand and with the other hand we must turn the zoom ring and the ring of focus.
It takes a while to take the hand. With the thumb, ring and little fingers are taken into the goal. With the index the zoom ring or focus and contrast with the major index.
A camera is also lighter than a SLR. But an SLR has many good points. Starting with the quality of the video. We can say that the two recorded in 1920x1080 pixels,
25 frames / second, if one has neither a good nor a good target sensor, the quality will be poor. On a picture (as in video by the way) when looking only at the technical
level, quality comes at 70% of the target and 30% of the case. that's for raw files. After there is the compression. Plus it is great and the file is small (in place) but
the quality drops ... and fall quickly.
An SLR also for him being able to change lenses and lens that has a great focal ''range''(which zoom a lot, for example 20x) will have a miserable quality from a zoom with
a range over small. In the best case would require a zoom range with a huge, but with the quality of a fixed focus throughout the range. There is also the size of the sensor,
this will allow two things, one: the smaller depth of field on a large sensor relative to a small sensor (aperture equal) this allows the highlighting of the subject and of
have a background with a beautiful blur. The other good point of the large sensor, noise management. Plus the sensor is large (for the same number of pixels) there will be
less noise when the ISO goes up. it can shoot in lower light conditions or with greater speed or a smaller aperture, or several at a time.
At equal quality from my SLR and a camera, where the SLR is approximately 2'500€, the camera will cost tens of thousands of euros. The objectives also cost, less for a DSLR.
- - - - - -
2) - The camera moves
The camera movements are three in number: zoom, Traveling, pan.
a) - Zoom is to turn the zoom ring / lens to bring the subject without having to move (zoom out The opposite is the handling.).
It is highly not recommended to use the digital zoom instead of optical zoom because digital zoom catastrophically destroys the quality.
- There is a zoom technique coupled to a reverse traveling, also known as Hitchcock's Vertigo, the coupling of the two giving a very particular
effect on the environment but leaving the same subject.
b) - Travelling is a déplacemant of the camera on a dolly, a vehicle or by hand. The movement can be lateral (left, right), depth (front, rear)
or height (up, down) but always in one direction and generally at a constant speed.
c) - The Panoramic is simply to rotate the camera to take a very wide stage (a mountain range for example).
Below is a video explanation with an example of each camera movement :
Avoid the maximum cumulative number of camera movements on the same sequence.
- - - - - -
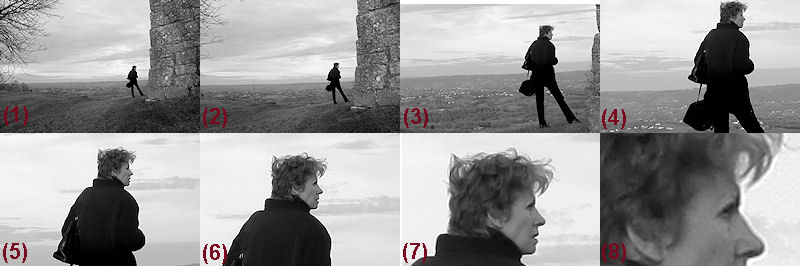
3) - Plans
Rather than an explanation for each plan, I'll just show you a picture where are the differents plans :
(1) - General Plan - GP
(2) - Large Plan - LP
(3) - Middle Plan - MP
(4) - American Plan - AP
(5) - Plan Height - PH
(6) - Chest Plan - CP
(7) - Close Up - CU
(8) - High Close Up - HCU.
- - - - - -
4) - The rules of video recording
- Always shoot close-ups (such as a door handle that turns a light bulb will turn off, etc ...) and general plans (ants
of an anthills, a crowd manifests, etc. ..) to make transitions to mount.
- Always allow 1 to 2 seconds while filming ''empty'' at the beginning and the end of the sequence to facilitate mounting.
- Filming in a stable with a tripod, and use a steadycam The optical device
(not digital because the quality is deteriorating rapidly.).
- Filming quietly, it is best to avoid sudden movements and jerky because it gives an effect''amateur.''
- Do not forget that when film is a story, it is most important.
- Alternate Plans (general, close, etc. ..) to punctuate the film. It is largely used here are the scenes shot in close-up and general plan.
- Make tests before filming seriously, if only for the settings (white balance, focus, depth of field, brightness).
- Rule of 180 °. This rule allows a good visual continuity. We draw a line on the ground and the cameras can not cross it at the risk of shoot the subject from a different
angle which would disrupt the continuity. To change the plan and cross the line, you must shoot a neutral plane in which the subject is positioned on that line.
- Do not shoot from the same point of view, different angles (the ground, in silhouette, etc. ...).
- The addition of background music is important (music, sound effects) it can create or reinforce a mood. But do not abuse either. Beware of copyright!
- Pay attention to the environment. Someone who smokes while filming could film the clouds of smoke along the stage. Same for sounds like uen passing car.
- Beware of false connections, from one scene to another character does not change color shirt when he did nothing (in history). Always check the continuity
elements of the characters and the environment.
- - - - - -
5) - Some tips.
Last part where various tips and tricks round the rules of shooting.
- When running, it is better to keep one or two zoom when making the documentary for flexibility but for the parties to dialogue / narrative
it is better to be fixed focus (24mm, 35mm, 50mm, 85mm) that can have a beautiful Bokeh!
- To reduce moiré and aliasing it is better to put his camera (for reflections) with the resolution of the camera closer to 1920x1080px
about 2Mpixels.
- For the development, where possible, it is better to manually rather than with the autofocus. With a little practice it is setting
developed much faster than an autofocus.
- To facilitate the manual focus, it is better to have a slightly closed diaphragm (F/5.6 - F / 8) in order to compensate for small movements
and avoid having to focus continuously. it also allows for flexibility if the screen is not very efficient in terms of sharpness.
- On some cameras and lenses, the focus lens is noisy, you must take that into account when film.
- As for the photo, respect the rule of thirds gives strength to the image.
- Start of a comprehensive plan is a good start. it allows to place the action.
- Always think of the autonomy of its battery and its memory cards. If you are a film festival in 2 hours, allow at least 2:30 of battery backup and
or the same for memory cards.
- It's best record with an external microphone connected to the camera or on a device dedicated solely to the sound with the microphone in the camera body. We
avoids noise settings buttons and friction for the development or zoom on a DSLR.
- If possible, turn the same scene with two devices at the same time having an angle of view, it helps to have two different''scene''
stroke but a single dose.
- Avoid too much. Both effects can be useful when they are measured, as it turns to the fair when there are too many.
- Whenever possible, it is better than film battery industry for handling but also because some chargers make noise.
Not necessarily for us but audible pulses such as an electric fence is very audible on a recording.
- In the subject of batteries as memory cards, it is better to number them if more than one, it avoids having to search for 5 minutes
those responsible.
- It may seem logical, but it is better to always protect his equipment a minimum (against shock, rain, dust and sand, etc. ...).
A few well placed plastic wrap used to protect a little bit equipment.
- The normal angle will place the viewer at the same level as your subject (tied). Diving (top view) will overwrite your subject and
give an impression of vulnerability and fragility about. The cons-diving (view from below) will grow and give the topic of importance,
of power.
- Remember to always clean the front lens and the viewfinder / eyepiece. It would be a shame to miss a scene due to dust on the lens.