Making a Micro Stereo and addition of a micro-ice
Use :
The stereo microphone can record stereo sound when shooting video. The addition of micro-mirror can make comments or accurately record sound in addition to the background
given by the stereo microphone (such as micro presenters reporting). The system connects with 3.5mm stereo jack. The stereo microphone is attached to the flash shoe of the
camera. It's a microphone a little bit different that I use but based on exactly the same system (I have a tube end metal mesh instead of PVC pipe).
Material :
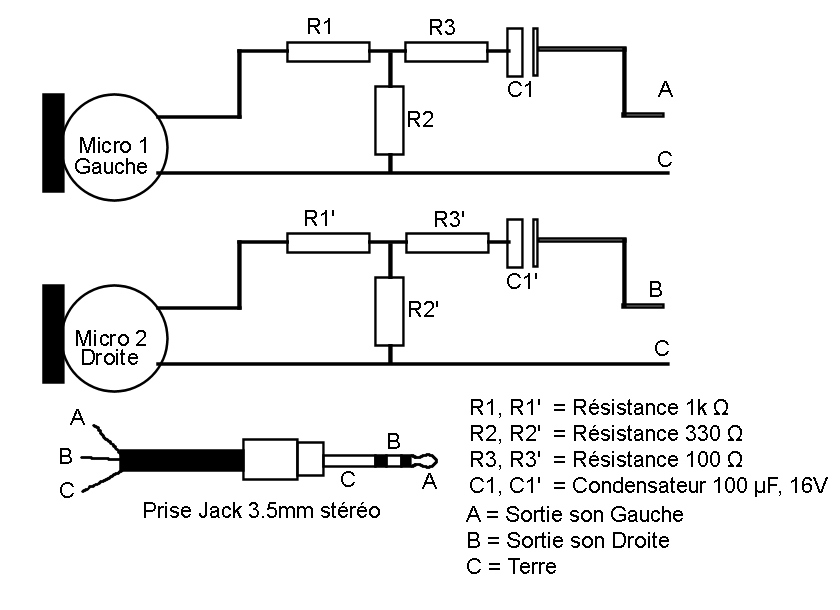
- 2 good quality microphones
- 2 resistance of 1000 (1K) Ohm
- 2 resistance of 330 Ohm
- 2 resistance of 100 Ohm
- 2 capacitors 100uF, 16V
- 2 male 3.5mm stereo jacks
- 15cm stereo cable
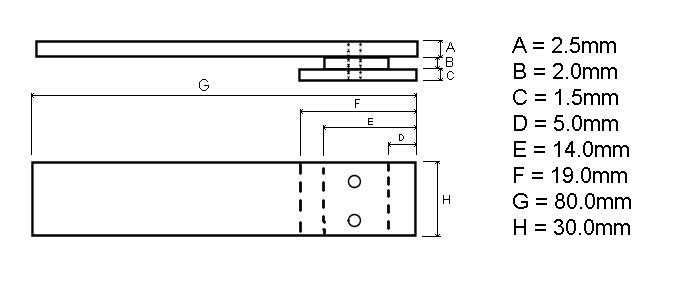
- An aluminum plate 80x30x2.5mm
- An aluminum plate 9x30x2.0mm
- An aluminum plate 19x30x1.5mm
- 2 screws M2x6mm
- A thin PVC tube of Ø25mm internal and 100mm long
- A perforated plate of Bakelite pre PCB basic (in lines)
- 2 slices of plastic Ø30mm x 1mm thick
- Contact glue (cyanoacrylate for example)
- Drill with a small lock of Ø2mm
- Bomb matt black paint (for car body preferred)
- The screwdriver for the 2 small screws M2
- soldering iron with tin
- a rectangle of black fabric 100x80mm (the thin felt)
- a microphone up basic desktop (found for a few euros in any supermarket)
- 100mm of wire (stainless steel preferred) hard Ø3mm
- Doubling a 3.5mm stereo jack (2 input female and 1 male output)
- two-component glue
Building :
1) Carry out electrical fixtures below by taking as little space as possible so that everything can get into the PVC tube to a length of 35 to 40mm and put microphones
in front to 60mm for those inclined to the right and 80mm for those inclined to the left. The distance values ??are based micro since the end of the Bakelite plate
component side (back side).
2) Adjust the three aluminum plates the following scheme, stick to the adhesive contact, drill two holes and screw the plates together (glue alone does not take very
long so I reinforced the basic idea with 2 screws M2 x 6mm).
3) Drill the PVC tube 60mm long, with a grid full of small holes Ø2mm. Paste the first puck at the end of the tube on the side of the drill holes and drill as the PVC tube.
4) Insert the bakelite plate with microphones in the direction of the holes in the PVC tube. Make a slight notch in the remaining washer to let the stereo cable. Place
a drop of contact cement on the inside edges of the PVC tube to glue bakelite plate and avoid the microphones running around in the tube.
5) Paste the puck back on the PVC tube and surrounds the hole in the tube with the black fabric. Stick to contact cement on the fabric PVC pipe ends.
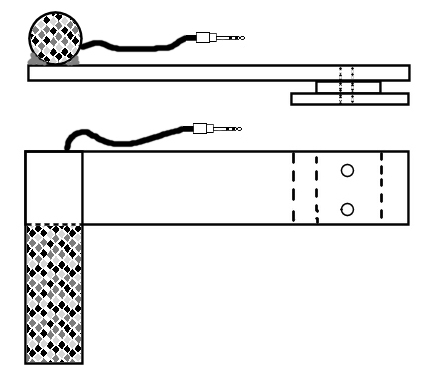
6) Stick to the two-component adhesive PVC tube on the top plate of aluminum as the drawing below:
7) Painting of 3 or 4 layers of the assembly (except the part with the tissue) in black. Once dry, your stereo microphone is ready.
8) Bend the piece of wire to form a spindle. One end of the spindle must be turned in on itself so as not to get hurt when you attach the microphone to his collar
or neck of someone else.
9) Remove the base of the foot of the microphone (for it does not interfere when used) and stick to the contact cement the''pin''about the upper third of the microphone so that it does
not fall when we will pass to someone. (Hint: In addition to the contact cement, I put two very small clips Colson to ensure a better hold of the pin.)
10) Painting of 3 or 4 layers of the assembly (except the tip with the microphone and on / off button if there is one) in black. Once dry, your micro-ice is ready.
It only remains to fix your stereo microphone on the flash shoe (if there would be an adjustment problem, add a bit of tape on the hoof''micro''to expand a little width so that
the microphone does not fall.), to put the Doubling your input 3.5mm jack of your device (camera or camcorder) and connect to a socket of the micro-Doubling your stereo and the
other socket, micro-ice.
Two tricks to use to finish:
A) When using the Doubling, always have two sockets wired to avoid interference on the soundtrack (parasite found in the air as radio or other).
B) The nearly 1.5m cable micro-ice is sometimes inconvenient and it is easily takes a tripping hazard. To avoid this, just stick to the adhesive contact and / or a small
paper clip necklace Colson about the middle, it can then either fix it on the strap of the device is in its neck (to avoid injury , one can put a small plastic ball stuck.).